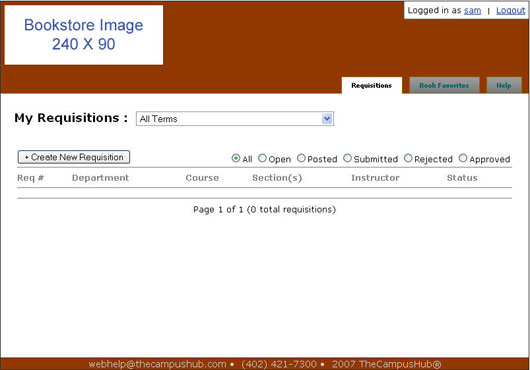
To create a new textbook requisition:
- Log into the Textbook Requisition system.
- Click the Create New Requisition button (Fig. 1).
Figure 1: Create New Requisition Button
- The Create a New Requisition screen will open (Fig. 2). Select the term for which you wish to create a requisition from the Term menu.
Figure 2: Create New Requisition
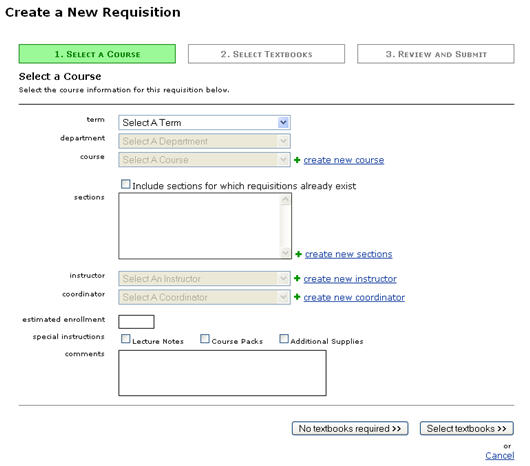
- Select the department for which you wish to create a requisition from the Department menu.
-
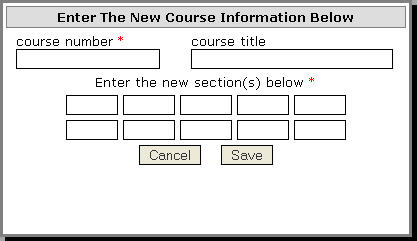
Select the course for which you wish to create a requisition from the Course menu. If the course does not exist in the Textbook Requisition system yet, you will need to click the Create New Course link to the right of the Course menu. Enter the course number, the course title, and the section numbers in the window that appears (Fig.
3). Click Save, then select the new course from the Course menu. The option to create a new course may not be available, depending on the bookstore’s settings.
Figure 3: Enter New Course Information
-
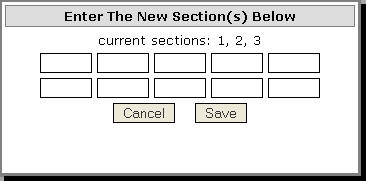
Select the section(s) for which you wish to create a requisition by clicking the corresponding checkboxes in the Sections field. You can choose to see just sections without requisitions or all sections. If the section does not exist in the Textbook Requisition system yet, you will need to click the Create New Sections link to the right of the Sections field. Enter the course numbers in the window that appears (Fig.
4). Click Save, then check the checkbox next to the new section. The option to create a new section may not be available, depending on the bookstore’s settings.
Figure 4: Enter New Section Information
-
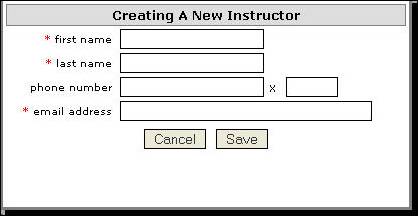
Choose the instructor from the Instructor menu. If the instructor does not exist in the Textbook Requisition system yet, you will need to click the Create New Instructor link to the right of the Instructor field. Enter the instructor’s first name, last name, phone number (optional), and e-mail address in the window that appears (Fig.
5). Click Save, then select the new instructor from the Instructor menu. The option to create a new instructor may not be available, depending on the bookstore’s settings.
Figure 5: Enter New Instructor Information
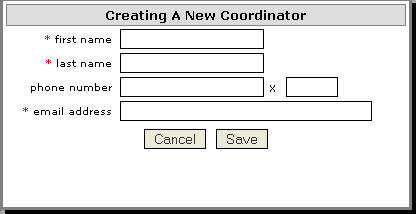
- If the bookstore uses coordinators, choose the coordinator from the Coordinator menu. (If the bookstore does not use coordinators, this menu may not display.) If the coordinator does not exist in the Textbook Requisition system yet, you will need to click the Create New Coordinator link to the right of the Coordinator menu. Enter the coordinator’s first name, last name, phone number (optional), and e-mail address in the window that appears (Fig. 6). Click Save, then select the new coordinator from the Coordinator menu. The option to create a new coordinator may not be available, depending on the bookstore’s settings.
Figure 6: Enter New Coordinator Information
- Enter the estimated enrollment.
- If there are lecture notes, course packs, or additional supplies necessary for the course, check the corresponding checkboxes.
- Enter any comments you wish to add to the requisition in the Comments field.
If there are no textbooks required for the course:
- Click the No Textbooks Required button at the bottom of the screen.
- Review the requisition (Fig. 7).
Figure 7: Review Requisition

- Click the Save This Requisition button.
-
If you are ready to submit this requisition to the bookstore, click the Submit This Requisition button (Fig.
8). This option may not be available, depending on the bookstore’s settings.
Figure 8: Submit Requisition
- Depending on the bookstore’s settings, you may receive an e-mail when the requisition is approved by the bookstore.
To add textbooks to the requisition:
- Click the Select Textbooks button.
- The textbook selection screen will open. There are several ways to add books to the requisition. You can search, use course history, add a book from your favorites, or manually create a new book.
To add textbooks using the search functionality:
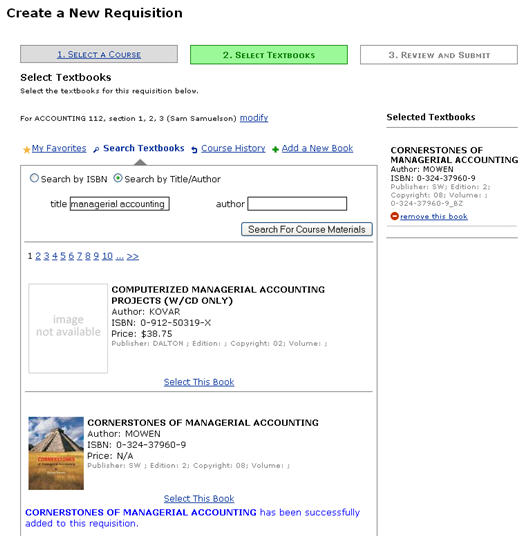
- Use the radio buttons to set your search for ISBN or author/title (Fig. 9).
- Enter an ISBN or author/title keyword.
- Click the Search for Course Materials button.
- The search results will display. To select a particular title, click the Select This Book link.
Figure 9: Search Results
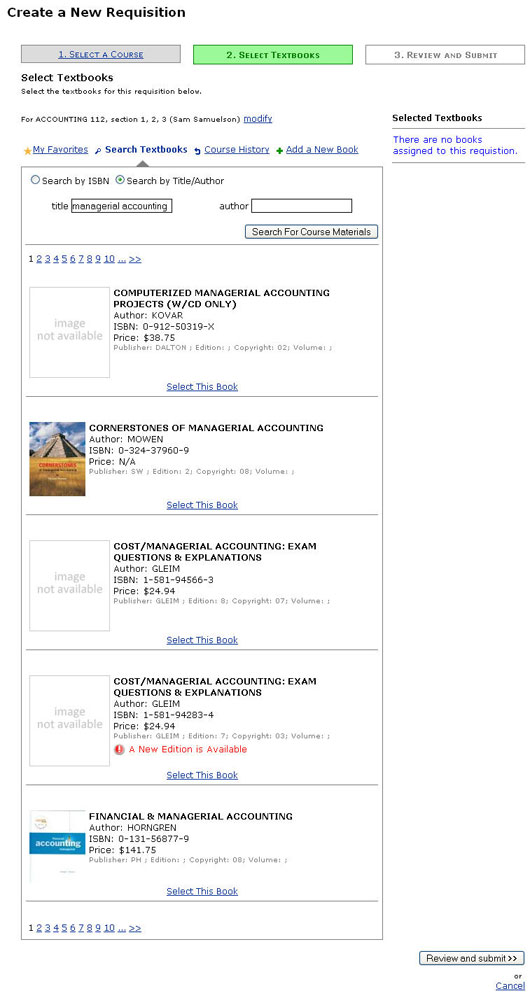
NOTE: This query searches the bookstore’s PrismWEB database and the NBC Buyer’s Guide.
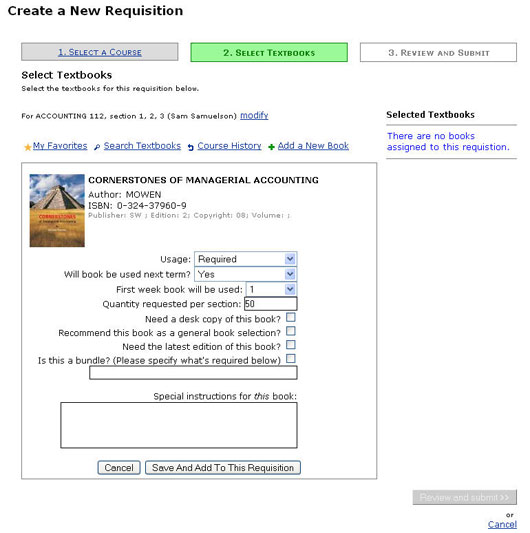
- Set the book parameters for the title you selected (Fig. 10).
Figure 10: Book Parameters
- Click the Save and Add to This Requisition button.
-
A message will display beneath the title in the search results to note that it has been added to the requisition. The title will also display beneath the Selected Textbooks header on the right side of the screen (Fig.
11).
Figure 11: Title Added to Requisition
- You can add other books using the search functionality or other available methods (favorites, course history, and manual addition) until all necessary titles have been added to the requisition. Click the Review and Submit button when you are finished.
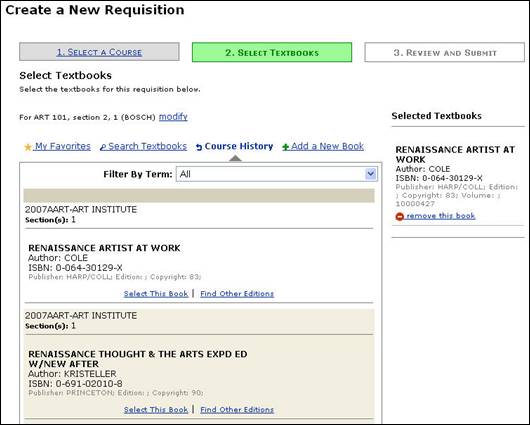
To add textbooks using course history:
- Click the Course History link.
-
All available textbook history for this particular course will appear (Fig.
12). If you want to see course history from a specific term, use the "Filter by Term" menu.
NOTE: If there is no course history for a particular course, the bookstore may not have past terms available in the Textbook Requisition system database. Contact the bookstore for more information.
Figure 12: Course History
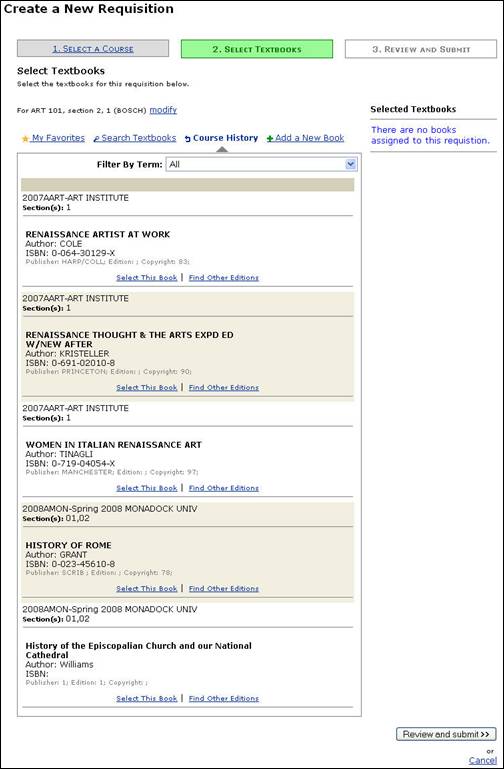
- To add a title to the requisition, click the Select This Book link (Fig. 12).
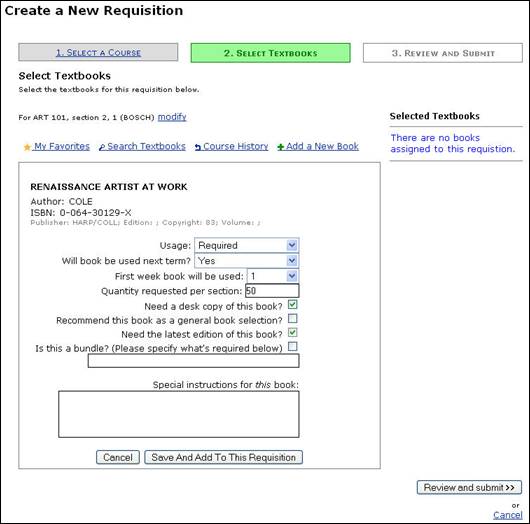
- Set the book parameters for the title you selected (Fig. 13).
Figure 13: Book Parameters
- Click the Save and Add to This Requisition button.
-
A message will display beneath the title in the search results to note that it has been added to the requisition. The title will also display beneath the Selected Textbooks header on the right side of the screen (Fig.
14).
Figure 14: Title Added to Requisition
- You can add other books using course history or add titles using other available methods (book favorites, search, and manual addition) until all necessary titles have been added to the requisition. Click the Review and Submit button when you are finished.
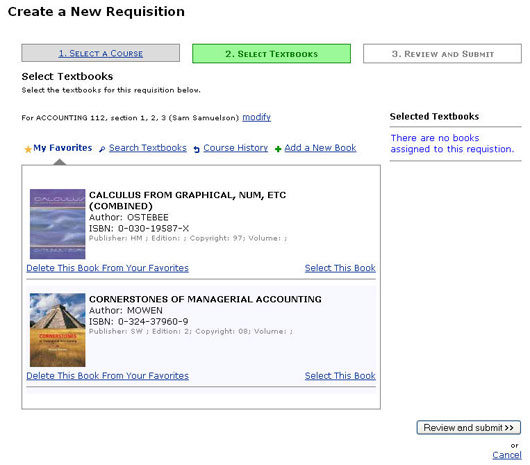
To add textbooks using your book favorites:
- Click the My Favorites link. (The screen may automatically open to this option if you have books saved as favorites.)
- To add a title to the requisition, click the Select This Book link (Fig. 15).
Figure 15: Book Favorites
- Set the book parameters for the title you selected (Fig. 16).
Figure 16: Book Parameters
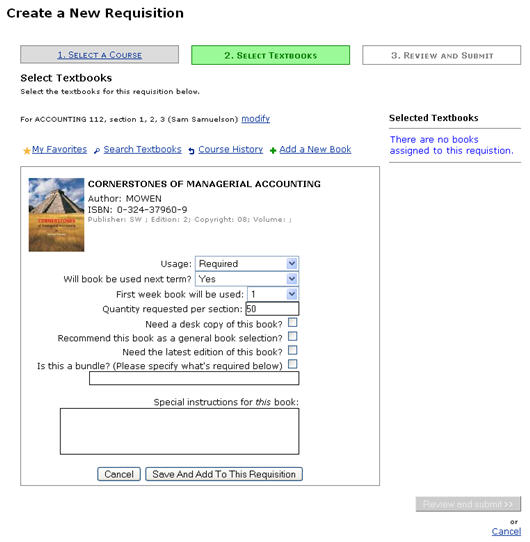
- Click the Save and Add to This Requisition button.
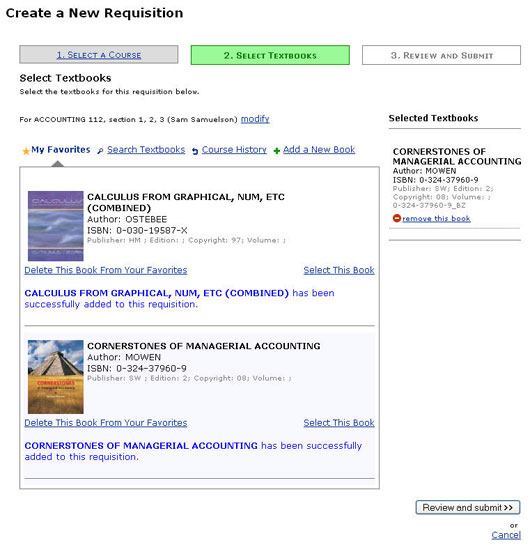
-
A message will display beneath the title in the search results to note that it has been added to the requisition. The title will also display beneath the Selected Textbooks header on the right side of the screen (Fig.
17).
Figure 17: Title Added to Requisition
- You can add other books from your favorites or add titles using other available methods (search, course history, and manual addition) until all necessary titles have been added to the requisition. Click the Review and Submit button when you are finished.
To add textbooks manually:
- Click the Add a New Book link.
-
Fill in the fields to add a textbook manually. You must enter at least the title, author, and ISBN (unless you check the "ISBN unknown" box) (Fig.
18).
Figure 18: Enter a Textbook Manually
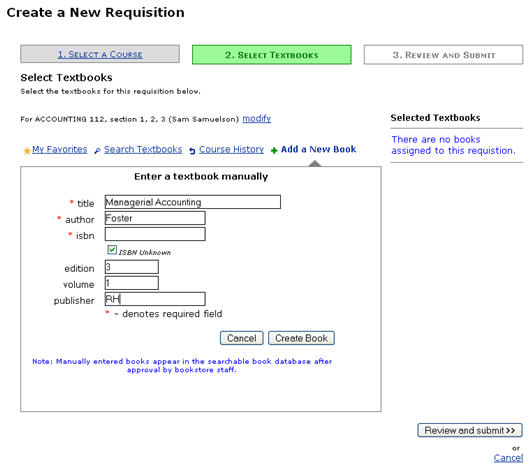
- Click the Create Book button (Fig. 18).
- Set the book parameters for the title you selected (Fig. 19).
Figure 19: Book Parameters
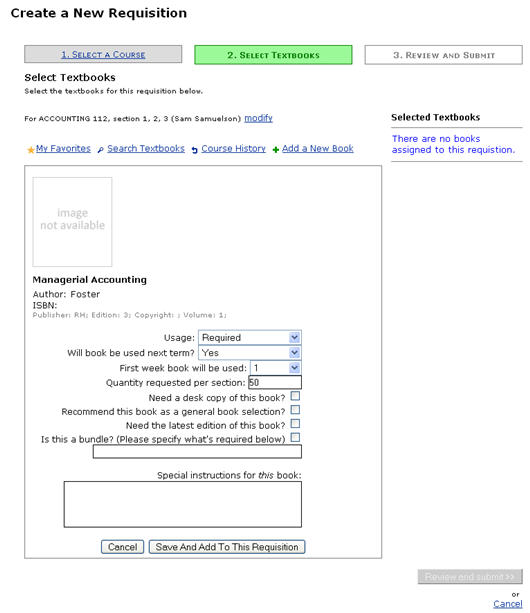
-
The title will also display beneath the Selected Textbooks header on the right side of the screen (Fig.
20). If you entered an ISBN that already exists in the book database, though, you’ll get a message asking you to select the existing book record or cancel.
Figure 20: Book Manually Added to Requisition
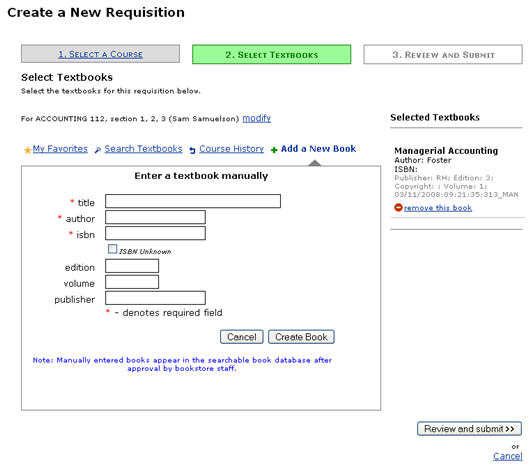
- You can add other books manually or add titles using other available methods (favorites, search, and course history) until all necessary titles have been added to the requisition. Click the Review and Submit button when you are finished.
(Back to Adding Textbooks to a Requisition)
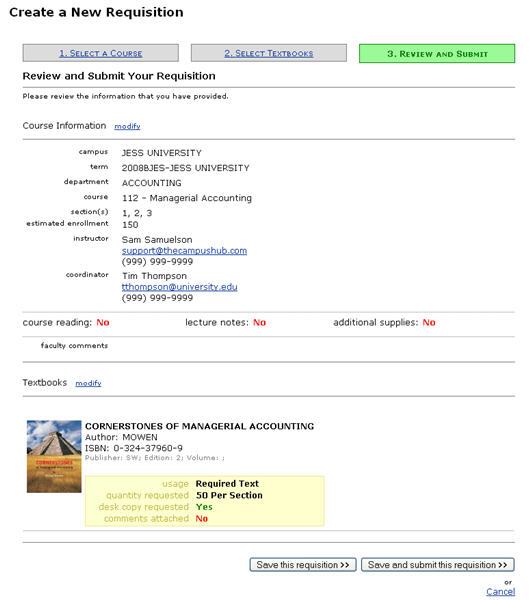
- Review the requisition to make sure all information and textbook selections are correct.
-
If you want to save the requisition but you are not ready to submit it to the bookstore, click the Save button. If you are ready to submit the requisition to the bookstore, click the Save and Submit button (Fig.
21).
Figure 21: Review Requisition
-
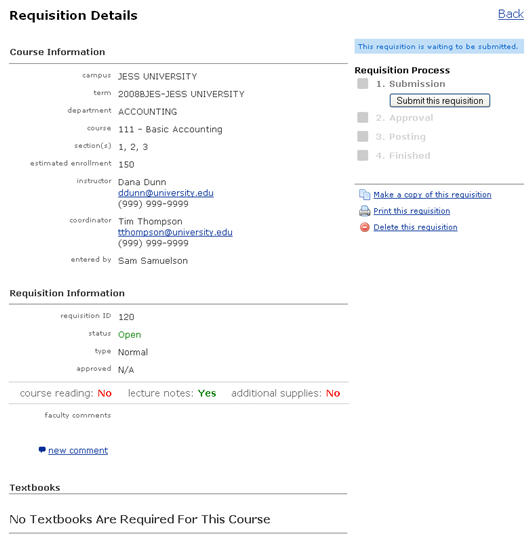
If you save the requisition, you can modify it until you are ready to submit it. It will appear on your home page in the Textbook Requisitions system. If you submit the requisition, it will also appear on your home page, but you may not be able to edit it (depending on the bookstore’s settings). Both the "save" and "submit" screens will allow you to create a new requisition based on the current requisition and to print the current requisition (Fig.
22).
Figure 22: Requisition Details
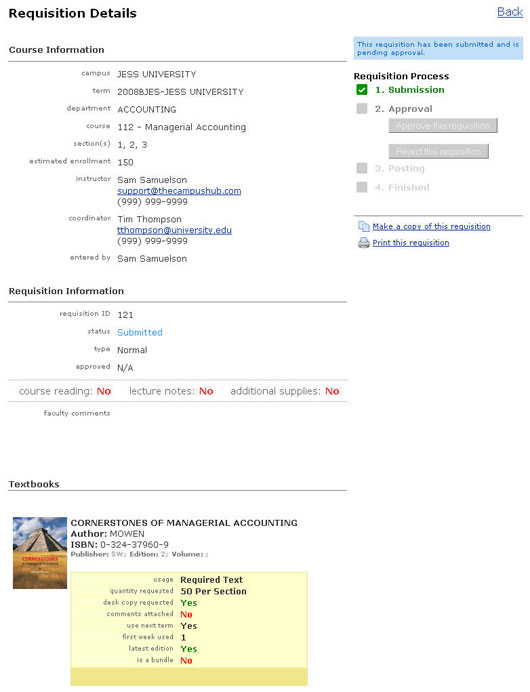
- Depending on the settings for your individual user account, you may be able to approve, reject, or post the requisition as well. If the boxes are enabled under the Requisition Process header (upper right corner), you have these permissions.